Layered Lighting Ideas Beyond Basic Pendants
How to illuminate your home like a professional — room by room, layer by laye.
If your home lighting strategy begins and ends with a pendant over the kitchen island and a floor lamp in the corner, you’re leaving the soul of your space on the table. Layered lighting — the art of combining multiple light sources at different levels and intensities — is the single most transformative upgrade any homeowner can make. And it has nothing to do with chandelier envy.
As an interior designer who has worked on hundreds of American homes, from compact urban apartments in Chicago to sprawling ranch-style homes in Texas, I can tell you this with confidence: lighting is not an afterthought. It is the architecture of mood. The difference between a room that photographs beautifully but feels cold in person, and a room that makes you sigh with relief the moment you step inside, almost always comes down to how the light is layered.
In this guide, I’m breaking down everything you need to know about layered lighting — the principles, the fixtures, the room-specific strategies, and the mistakes to avoid. Pendants are lovely. But they’re just the beginning.
What Is Layered Lighting? The Three-Layer Framework
Before we dive into specific ideas, let’s establish the vocabulary. Professional lighting designers and interior decorators work with three fundamental layers of light, each serving a distinct purpose. Together, they create what lighting experts call visual comfort — a space where no single light source overwhelms and no corner falls into harsh shadow.

Understanding this framework transforms you from someone who buys light fixtures to someone who designs with light. It’s the difference between decorating and designing. Once you internalize these three layers, you’ll walk into any room — a restaurant, a friend’s living room, a hotel lobby — and immediately understand why it feels the way it does.
| Layer | Also Called | Purpose | Common Fixtures | Ideal Lumen Range |
|---|---|---|---|---|
| Ambient | General Lighting | Overall illumination — the base layer that fills the room | Recessed cans, flush mounts, chandeliers, cove lighting | 1,500–3,000 lumens |
| Task | Functional Lighting | Focused light for specific activities like reading, cooking, or grooming | Under-cabinet strips, table lamps, swing-arm sconces, vanity lights | 450–900 lumens per area |
| Accent | Decorative Lighting | Highlights architectural features, artwork, or objects of interest | Picture lights, directional spots, LED strips, uplights | 150–400 lumens (focused) |
Pro Tip
Always put every light source in your home on a dimmer switch — including your table lamps via a smart plug. Being able to dial down ambient light while keeping task and accent layers at full brightness is the single most powerful tool in residential lighting design. Dimmers cost $15–$40 each and are the highest-ROI upgrade you’ll ever make.
Ambient Lighting: Going Far Beyond the Ceiling Fan Combo
Most American homes default to a single overhead fixture — often a ceiling fan with a built-in light kit — and call it done. This is the fastest route to flat, unflattering light that makes everyone in the room look like they’re being interrogated. Ambient lighting done well should feel like you’ve raised the ceiling and softened the walls.
Recessed lighting (also called can lights or downlights) is the workhorse of modern ambient illumination. When spaced properly — roughly one fixture per every 4 to 6 feet of ceiling height — they create even, shadowless coverage. But here’s what most homeowners miss: the trim style and bulb color temperature matter enormously. Always select LED bulbs in the 2700K–3000K range for living spaces. Anything above 4000K starts to feel clinical, like a dentist’s office.
Cove and Coffer Lighting: The Designer’s Secret Weapon
Cove lighting involves concealing LED strip lights inside an architectural ledge or crown molding recess, allowing light to wash upward across the ceiling. It adds perceived height to any room, creates an incredibly warm glow, and photographs stunningly. Coffered ceiling lighting — placing fixtures inside structural grid beams — adds depth and dimension to flat ceilings for a fraction of a renovation budget.
Light that you cannot see the source of is always more beautiful than light you can. The goal is to illuminate the room, not to illuminate the bulb.— Ingo Maurer, Legendary Lighting Designer.
Torchieres and Indirect Floor Lamps
For renters or homeowners who can’t rewire, a torchiere lamp — a tall floor lamp that directs light upward — bounces illumination off the ceiling to create soft, diffused ambient light. Pair two in opposite corners of a living room and you’ll transform the feel of the space without touching a single wire. Look for models with dimmer switches built into the cord.
Task Lighting Ideas That Are Both Functional and Beautiful
Task lighting is where form meets function — and where most homeowners either underinvest or make purely utilitarian choices that undermine the aesthetics of a beautifully designed room. The goal is to deliver targeted, glare-free illumination exactly where an activity takes place, without that fixture looking out of place when the task is done.
Under-cabinet lighting in the kitchen is perhaps the highest-impact task lighting upgrade available to American homeowners. Puck lights have largely been replaced by continuous LED strip lights or linear LED bars, which eliminate the uneven “spotlight” effect. Look for strips with a high CRI (Color Rendering Index) of 90 or above — this ensures your food looks appetizing and your countertop materials display their true beauty.
- Swing-arm wall sconces: Mounted beside a bed or reading chair, these replace the bedside table lamp entirely, freeing up surface space and delivering directional light exactly where you’re reading. Brands like Rejuvenation and Schoolhouse offer stunning American-made options.
- Picture-frame desk lamps: Modern LED desk lamps with articulating arms (like the BenQ e-Reading lamp) now provide even, shadow-free illumination across an entire desk surface — critical for home offices.
- Vanity lighting strips: Replace the single bar above your bathroom mirror with vertical fixtures on either side of the mirror. Side-mounted vanity lights eliminate the raccoon-eye shadows caused by overhead-only placement.
- Under-island pendants (drop-down task): If your kitchen island is where you prep food, low-hung pendants (18–24 inches above the surface) serve as both task and ambient light. Choose pendants with downward-facing opaque shades for focused illumination.
- Closet lighting: Often completely ignored. LED strip lights inside closets on motion sensors are a game-changer for anyone who has ever grabbed a navy blazer in the dark thinking it was black.
Pro Tip
When selecting task lighting for a reading nook or home office, look for fixtures with a CRI (Color Rendering Index) of 95+ and a color temperature between 3500K and 4000K. This range reduces eye strain significantly compared to warm 2700K bulbs, without feeling as cold as daylight-spectrum (5000K+) options. Your eyes will thank you after a two-hour reading session.
Accent Lighting: The Layer That Makes Rooms Look Magazine-Worthy
Accent lighting is the most neglected layer in American homes and the most transformative when done correctly. It’s the layer that separates a room that looks “nice” from a room that looks intentional. Accent lighting creates focal points, adds depth, and draws the eye — it’s the lighting equivalent of jewelry on an outfit.
The golden rule of accent lighting: an accent light source should be approximately three times brighter than the ambient lighting level in the same zone. This ratio creates the visual “pop” that makes artwork glow, makes bookshelves look curated, and makes architectural details feel deliberate rather than accidental.
| Accent Technique | Best For | Fixture Type | Design Effect |
|---|---|---|---|
| Wall Washing | Textured walls, stone, brick, fabric panels | Directional recessed spots or wall sconces | Reveals texture, adds warmth and depth |
| Picture Lighting | Framed artwork, gallery walls | Surface-mount picture lights, adjustable spots | Gallery-like drama, focal point creation |
| Shelf Lighting | Built-ins, bookcases, display cabinets | LED strip lights (top or bottom of shelves) | Depth, warmth, curated display feel |
| Uplight Torchieres | Plants, sculpture, architectural columns | In-floor uplights, small tabletop uplights | Dramatic shadows, sculptural presence |
| Toe-Kick Lighting | Kitchen islands, bathroom vanities | LED strips recessed into the base | Floating effect, subtle luxury detail |
| Stair Lighting | Staircases, hallways | Recessed step lights, wall-embedded LEDs | Safety + dramatic architectural highlight |
Room-by-Room Layered Lighting Strategy
Understanding the three-layer framework is one thing. Applying it to specific rooms — each with different activities, traffic patterns, and emotional tones — is where real design skill comes in. Here’s how I approach layered lighting in the most-used rooms of an American home.
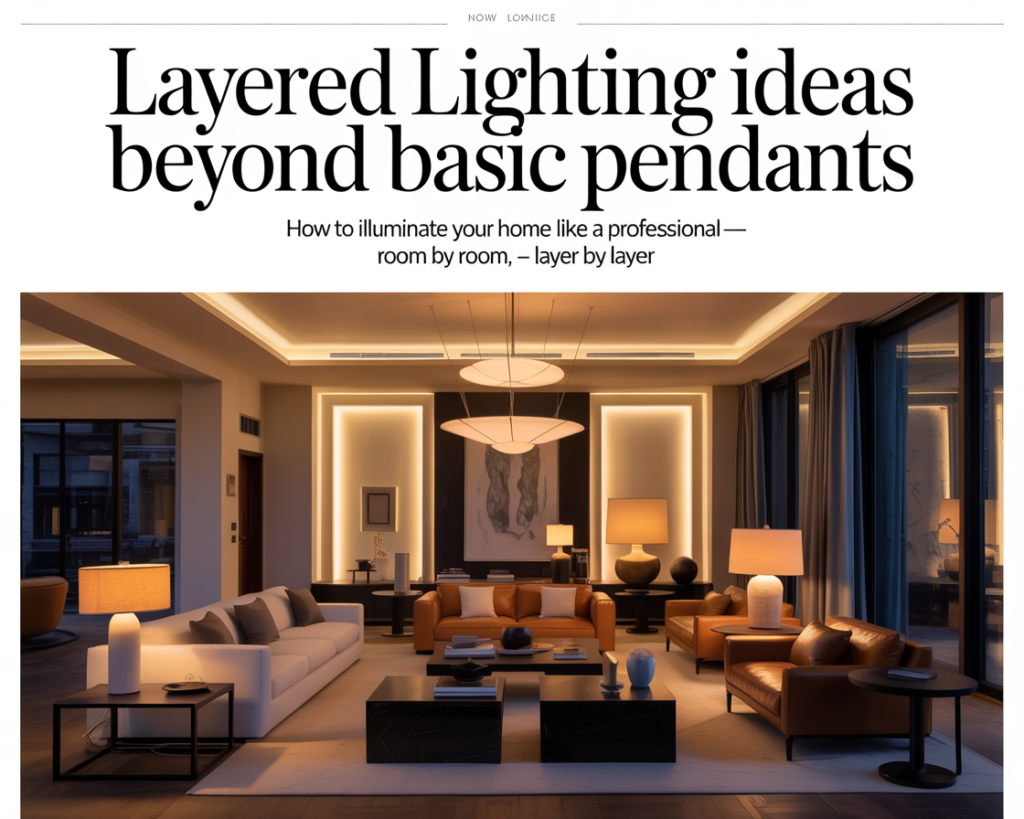
Living Room
Aim for 5–7 light sources at different heights. No single overhead fixture should dominate. Think recessed ambience + table lamps + accent spots + a floor lamp.
Kitchen
Separate your cooking zone (task), eating zone (ambient/pendant), and display zones (accent under-cabinet). Never use one fixture for all three functions.
Primary Bedroom
Wall sconces replace bedside lamps. Cove lighting replaces overhead. Closet LEDs complete the layer. Avoid cool-white bulbs entirely in the bedroom.
Bathroom
Side-mounted vanity fixtures + recessed ceiling + backlit mirror. Add an LED strip behind the mirror for a floating effect and flattering fill light.
Home Office
Bias lighting behind your monitor (reduces screen eye strain), dedicated desk task lamp, ambient overhead on a dimmer for video call backgrounds.
Dining Room
Chandelier or pendant (lowered to 30–34″ above table surface) for ambient/mood, plus recessed spots for wall art and a buffet table lamp for warmth.
The Living Room: Where Layering Matters Most
The living room is the most complex lighting challenge in any home because it serves the most functions: casual conversation, movie watching, reading, entertaining, and quiet solitude. Each activity requires a radically different lighting condition. A room designed only for conversation will be too bright for movies; a room designed only for movie nights will be too dim and moody for a dinner party.
The solution is to build in enough independent zones — each on its own switch or smart dimmer — that you can dial the room up or down like a mixing board. I typically recommend a minimum of four independent circuits in a living room: recessed ambient, a table lamp circuit, accent lighting, and any feature fixture. Pair this with a smart home system like Lutron Caséta or Philips Hue and you can create pre-programmed “scenes” for every mood.
Smart Lighting and Controls: The Modern Layer Everyone Needs
No discussion of layered lighting in 2026 is complete without addressing smart lighting controls. What was once a luxury for tech enthusiasts has become a genuinely practical and affordable tool for any homeowner serious about their lighting design. Smart dimmers, color-tunable bulbs, and app-controlled scenes are now the fourth invisible layer in a well-designed home.
The most impactful smart lighting upgrade you can make isn’t buying color-changing bulbs for party mode — it’s installing smart dimmers on every circuit in your home and programming two or three scenes per room. A “morning” scene in your kitchen might bring task lighting to 100% and ambient to 60%. An “evening” scene might drop ambient to 30% and turn accent lighting to 80%. These small automations do more for your daily quality of life than almost any other home improvement.
- Start with smart dimmers — Lutron Caséta, Leviton Decora, and Legrand Radiant all offer reliable in-wall dimmers that work with standard LED bulbs. No hub required for basic use.
- Use tunable white bulbs in living and bedroom areas — These shift from warm (2700K) in the evening to cool (4000K) in the morning, supporting your natural circadian rhythm.
- Set automated scenes — “Sunrise,” “Work,” “Dinner,” and “Movie” scenes that adjust multiple fixtures simultaneously with one tap or voice command eliminate decision fatigue.
- Add motion sensors in hallways and bathrooms — Nobody needs to fumble for a switch at 3 AM. Motion-activated lighting at 10–15% brightness guides you safely without disrupting sleep.
- Install bias lighting behind TVs — An LED strip behind your television, set to match the screen’s color temperature, reduces the contrast ratio perceived by your eyes and dramatically cuts viewing fatigue.
Good light makes food taste better, skin look healthier, and conversations feel warmer. It’s the most underrated form of hospitality in any American home.— Nate Berkus, Interior Designer and Author
Common Layered Lighting Mistakes to Avoid
After years of working with homeowners who’ve made every lighting mistake imaginable, I’ve compiled the most common offenders. These are the errors that cost money to fix and, more importantly, make rooms feel wrong without anyone being able to put their finger on why.
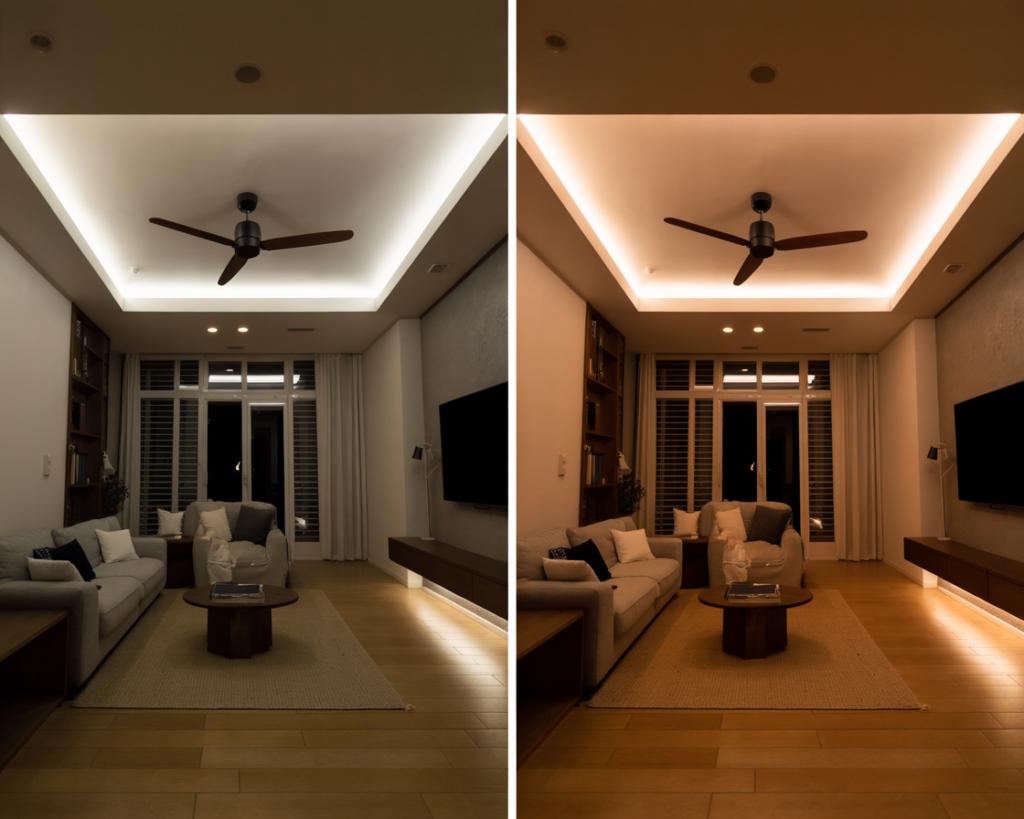
The most damaging mistake is treating lighting as a single purchase rather than a designed system. Homeowners spend $800 on a beautiful pendant and then plug in a $19 floor lamp with a 5000K daylight bulb next to it — and wonder why the room feels off. Consistency in color temperature across all fixtures in a room is non-negotiable. Every single bulb in your living room should fall within a 200K range of each other, ideally all at 2700K or all at 3000K.
- Mixing color temperatures: 2700K warm white lamps next to 5000K daylight bulbs creates visual incoherence. Pick one temperature per room and commit.
- Hanging pendants too high: Over dining tables, pendants should hang 30–34 inches above the table surface. Higher than that and they lose their intimacy and effectiveness.
- Recessed lighting in a grid: Placing can lights in a perfect geometric grid creates uniform, flat illumination. Instead, cluster them over zones of activity (seating area, kitchen peninsula) and leave dark zones for drama.
- Ignoring the vertical plane: Most homeowners light only horizontal surfaces (floors and countertops). Lighting walls and vertical surfaces adds perceived spaciousness and warmth.
- Skipping dimmers: A light fixture without a dimmer is like a gas stove with only one setting. Non-negotiable in every room.
- Over-relying on recessed lighting: Recessed cans as the only source of light in a living room creates a “grocery store” effect — bright, flat, and completely devoid of atmosphere.
The 2700K Rule for Residential Spaces
For bedrooms, living rooms, dining rooms, and any space where relaxation or hospitality is the goal, always default to 2700K (warm white) LED bulbs. Reserve 3000K for kitchens and home offices where task accuracy benefits from slightly cooler, crisper light. Avoid anything above 4000K in living spaces entirely — it disrupts melatonin production and makes people look tired and washed out.
Outdoor and Transitional Space Lighting: Often Overlooked, Always Impactful
Layered lighting shouldn’t stop at the back door. Outdoor living spaces — patios, decks, covered porches — deserve the same three-layer approach as interior rooms. The ambient layer might come from overhead string lights or a ceiling fan with a light kit on a covered porch. Task lighting serves the grill station and outdoor kitchen. Accent lighting highlights landscaping, architectural features, and pathways.
Pathway lighting and landscape uplighting are the most impactful outdoor lighting investments you can make for both security and curb appeal. Solar-powered path lights have improved dramatically in quality and reliability over the past few years — brands like VOLT Lighting and Hampton Bay now offer solar options with consistent, warm-toned output that doesn’t look cheap. For serious landscape lighting, low-voltage wired systems on a timer and photosensor remain the professional standard and the most recommended approach by outdoor designers.
Budget Breakdown: Layered Lighting at Every Price Point
| Budget Level | Living Room Strategy | Estimated Cost | Where to Shop |
|---|---|---|---|
| Starter ($200–$500) | 2 table lamps (warm LED) + 1 floor torchiere + plug-in dimmer adapters | ~$280–$420 | IKEA, Target, Amazon |
| Mid-Range ($500–$2,000) | Smart dimmers on all circuits + new overhead fixture + 2 table lamps + LED strip accent | ~$800–$1,400 | Home Depot, Wayfair, Lamps Plus |
| Designer ($2,000–$6,000) | Full Lutron system + recessed layout redesign + statement fixture + custom built-in accent | ~$3,000–$5,500 | Rejuvenation, Visual Comfort, Arteriors |
| Luxury ($6,000+) | Integrated smart home lighting control, custom cove build-out, museum-quality art lighting | $6,000–$20,000+ | Working with a lighting designer |
Final Thoughts: Light Is the First Thing You Feel and the Last Thing You Notice
The paradox of great lighting design is that when it’s done well, no one talks about it. Guests don’t say, “I love how you’ve layered your ambient and accent lighting.” They say, “This room just feels so warm,” or “I always feel so comfortable here.” That invisible comfort — the sense that a space is effortlessly welcoming — is the real result of a thoughtful layered lighting plan.
You don’t need to redesign your home, rewire every room, or spend tens of thousands of dollars to begin layering your light. Start in the room where you spend the most time. Add a dimmer to your existing overhead. Buy two table lamps at different heights. Add a small LED strip inside your bookcase. Stand back, dim the overhead to 30%, and watch what happens to the room. That moment — when a flat, ordinary space suddenly has depth, warmth, and character — is why I fell in love with interior design in the first place.
Light is the one design element that costs nothing to change and changes everything. Use it with intention, use it in layers, and use it generously. Your home — and everyone in it — will feel the difference.
Layered LightingHome DecorInterior DesignAmbient LightingTask LightingAccent LightingSmart HomeLED LightingLiving Room DesignLighting Tips
Alexandra Moore is a certified interior designer based in Nashville, TN, with over 15 years of residential design experience across the United States.