Your complete guide to carving out beautiful, functional spaces — no walls required.
Studio apartment living is the ultimate design challenge — and honestly, one of my absolute favorites. When a client walks in panicked that their living room, bedroom, and office all share 450 square feet, I reach for the same secret weapon every single time: area rugs. The right rug placement doesn’t just add warmth and texture; it creates visual boundaries that make your brain register distinct “rooms” within a single open-plan space. No construction. No landlord drama. Just smart, intentional layering.
In this guide, I’ll walk you through everything you need to know about using area rugs to zone a studio apartment — from choosing the right rug sizes and materials to laying out multiple zones like a pro. Whether you’re working with a New York micro-apartment or a Denver loft, these principles will transform how you live in — and love — your space.
73%
of renters say they want better space definition in open-plan units
2–4
distinct zones achievable in a typical 400–600 sq ft studio
$0
cost to your landlord security deposit
the zones
Why Area Rugs Are the #1 Tool for Studio Apartment Zoning
Before we dive into the how, let’s talk about the why. Studio apartment zoning is about creating psychological separation between functional areas — your sleeping zone, your living zone, your workspace, and your dining nook. Walls are the obvious solution, but they’re permanent, expensive, and often not permitted in rentals. Area rugs solve this elegantly.
Unlike room dividers or bookshelves, rugs work horizontally — they define space at the ground level, which is where our eyes naturally establish room boundaries. A plush wool area rug under your sofa signals “living room,” while a sleek flatweave jute rug in the corner whispers “home office.” No ceiling-to-floor structure needed. The visual separation happens naturally and feels genuinely organic.
“A rug doesn’t just cover the floor — it defines the intention of a space. In a studio, every rug is doing double duty: it’s decor and it’s architecture.”
— NCIDQ-Certified Interior Designer, 12 years in small-space residential design
your zones at a glance
Identify Your Zones Before You Shop
The most common mistake I see studio dwellers make is buying rugs before they’ve mapped their zones. Spend 20 minutes with a tape measure and some painter’s tape on the floor first. The four zones most studios need are:

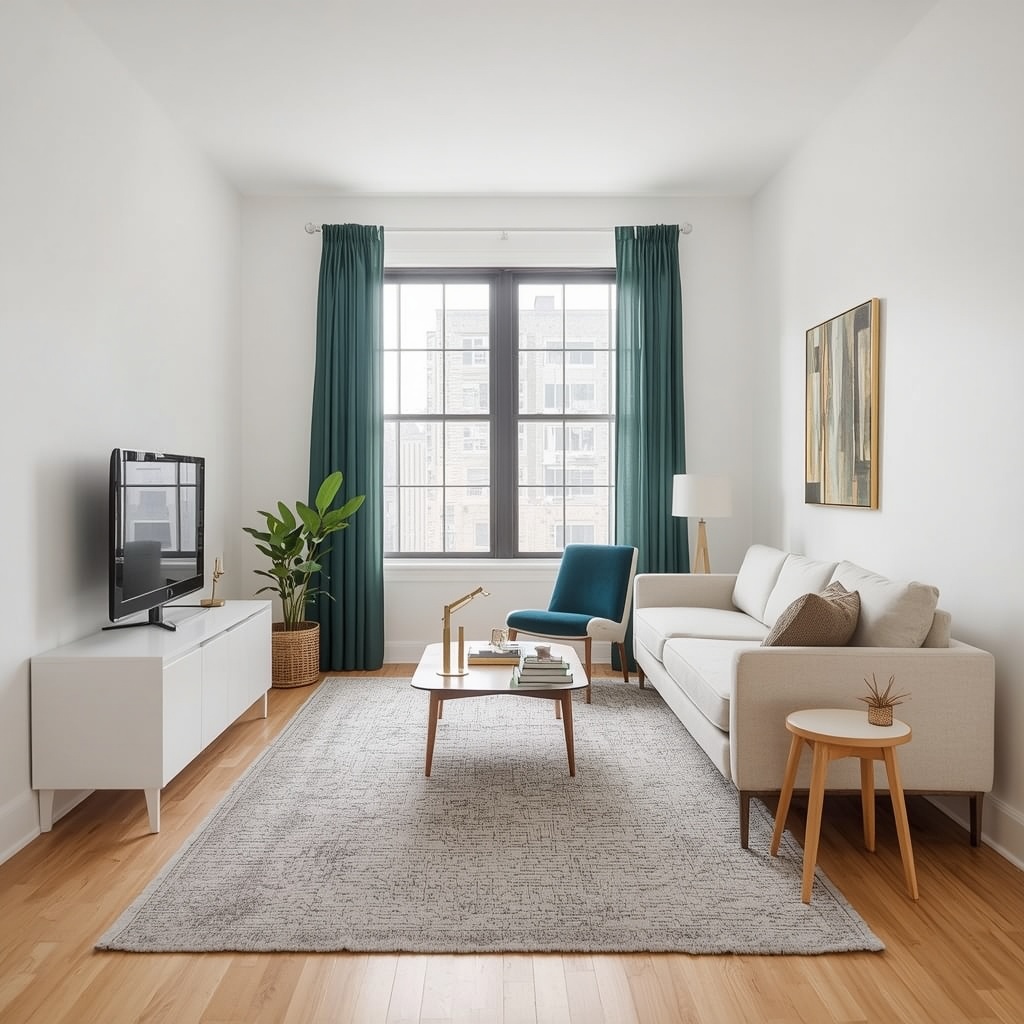
Living Area
Your main gathering, relaxing, and entertaining zone
Sleep Zone
Bedroom area with your bed as the anchor piece
Work / Study
Dedicated desk area separated from rest and leisure
Dining Nook
A small table area anchored with its own rug layer
Not every studio needs all four — prioritize based on your lifestyle. A remote worker needs a strong work zone. Someone who loves hosting needs a generous living zone. Define what you need, then design for it.
sizing guide
The Right Rug Size for Each Zone — A Complete Reference
Getting rug sizing right is non-negotiable. Too small, and your furniture looks like it’s floating on a postage stamp. Too large, and the zones bleed into each other, defeating the purpose entirely. Here’s my go-to sizing guide for studio zoning:

| Zone | Recommended Rug Size | Furniture Rule | Difficulty |
|---|---|---|---|
| Living Room | 8×10 ft or 9×12 ft | All sofa legs on rug, or at least front legs | Easy |
| Bedroom | 8×10 ft (Queen) / 9×12 ft (King) | Extend 18–24 in on each side of bed | Easy |
| Dining Nook | 5×8 ft or 6×9 ft | All chair legs stay on rug when pulled out | Moderate |
| Home Office | 5×7 ft or 6×9 ft | Chair rolls freely, desk fully on rug | Varies |
| Entryway | 3×5 ft or runner | Marks transition from door to living space | Check fit |
Pro Tip
Always tape out your rug dimensions with painter’s tape before purchasing. Living with the outline for 48 hours reveals whether the size works with how you actually move through the space — not just how it looks in a floor plan.
material matters
Choosing the Right Rug Material for Each Studio Zone
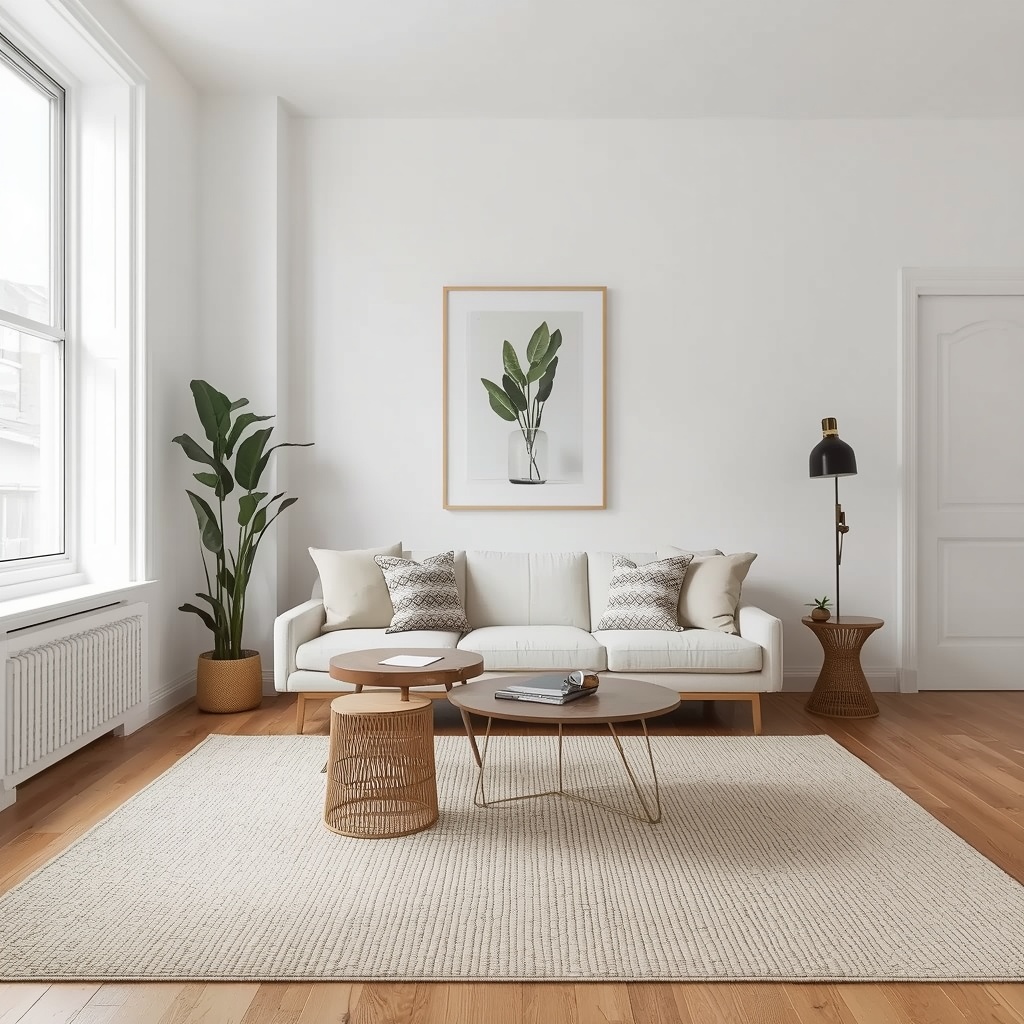
Material selection is where good rug zoning becomes great rug zoning. Different textures do different psychological work. A plush, high-pile rug in the bedroom signals comfort and signals rest. A flat-weave or sisal rug under your desk says “this is where we focus.” Using intentionally different textures reinforces your zone distinctions even when the colors are harmonious.
Here’s a quick material breakdown to help you shop smarter:
- Wool rugs — Best for living rooms and bedrooms. Naturally stain-resistant, durable, and luxurious underfoot. A great long-term investment for your primary living zone.
- Jute & sisal rugs — Perfect for home offices and dining zones. Their organic texture adds warmth without visual weight, and they hold up well under chair legs and foot traffic.
- Polypropylene / synthetic rugs — The budget-friendly, stain-proof hero for anyone with pets or kids. Great for dining and entryway zones where spills are likely.
- Cotton flatweave rugs — Light, layerable, and easy to clean. Excellent for small accent zones like under a reading chair or in a narrow entryway.
- Shag / high-pile rugs — Reserve for the bedroom zone only. Too hard to maintain in high-traffic areas, but they create an incredibly cozy, grounded bedroom feel.
color strategy
Color Coordination: How to Make Multiple Rugs Look Intentional
The biggest fear I hear from clients about using multiple rugs in one studio is: “Won’t it look chaotic?” Not if you follow the designer’s rule of color cohesion. You don’t need matching rugs — you need coordinated rugs. Think of each rug as a piece of a deliberate color story.

The most foolproof approach is to pick one dominant hue and vary the intensity across your rugs. For example: a warm terracotta living room rug pairs beautifully with a muted blush bedroom rug and a natural jute home office rug. They all read as warm-toned without being matchy-matchy. You get visual variety and spatial definition at the same time.
“Your rugs don’t need to match — they need to agree. Think of them like a well-dressed family photo: everyone’s wearing something different, but the palette is harmonious.”
— Interior Styling Principle, Studio Design Practice
- Choose a base palette of 2–3 colors that appear throughout your space
- Let your largest rug (living zone) carry the most pattern or boldest color
- Use simpler, calmer rugs in secondary zones to avoid visual competition
- Pull in one color from each rug in your throw pillows or curtains to tie it all together
layout techniques
Step-by-Step: How to Lay Out Your Studio Zones Using Rugs
Now let’s get tactical. Here’s the approach I use with every studio client, from Brooklyn to San Francisco:
Layout Strategy Overview
| Step | Action | Key Consideration |
|---|---|---|
| 1 | Measure your total space and sketch a floor plan | Note windows, doors, and fixed features like kitchen islands |
| 2 | Assign zones based on natural light and traffic flow | Sleep zone near natural light; work zone near outlets |
| 3 | Tape out each zone on the floor | Leave 12–18 in of bare floor between zones as “breathing room” |
| 4 | Choose anchor furniture for each zone | Each zone needs one clear anchor (sofa, bed, desk) |
| 5 | Select rugs by size, then material, then color | In that order — proportion first, aesthetics second |
| 6 | Add rug pads under each rug | Non-slip pads are non-negotiable on hardwood floors |
| 7 | Live with it for a week before committing | Daily movement will reveal what needs adjusting |
Common Mistake to Avoid
Never place your rugs directly against each other with no gap. A bare stripe of floor between zones — even just 12 inches — is what actually creates the visual boundary. When rugs touch, the zones blur and the whole effect collapses.
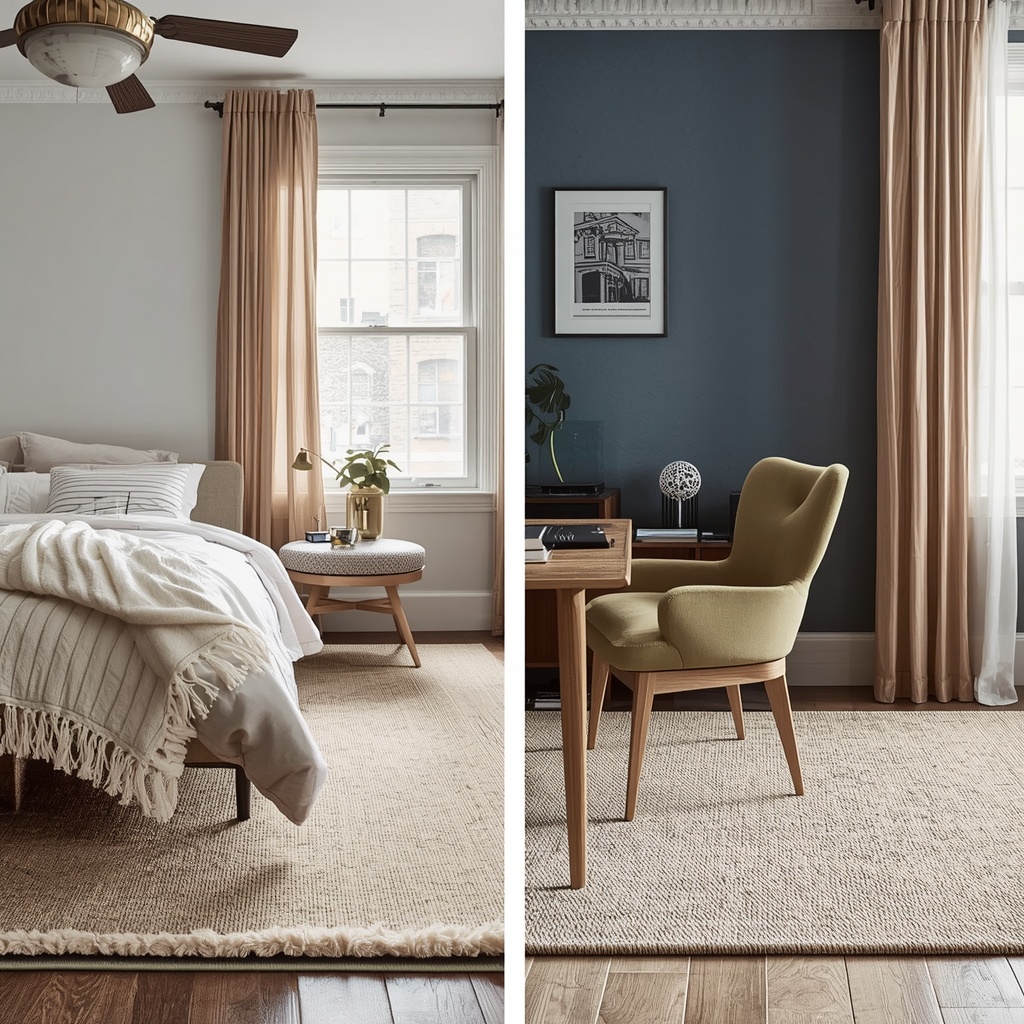
bedroom zone
Zoning Your Sleep Space: The Bedroom-Within-a-Studio Formula
Your bedroom zone is the most personal and arguably the most important zone to get right. The goal is psychological privacy — making your bed feel like it’s in a separate room, even when it’s technically 8 feet from your couch. A properly placed rug is your most powerful tool for achieving this.

Place a large rug (8×10 minimum for a queen bed) so it extends at least 18 inches on the sides and foot of the bed. When your feet hit that rug as you get up in the morning, your body registers “bedroom.” Pair this with a small bedside table, a pendant light or sconce, and curtains you can pull partially across — even half-drawn linen curtains suggest enclosure without blocking light or making the space feel claustrophobic.
- Orient your bed so the headboard faces a wall — avoid floating it in the center of the room
- Use a high-pile wool or shag rug in a warm neutral or deep jewel tone
- Add a small, contrasting accent rug or sheepskin at the foot of the bed for layered texture
- Keep the rug color distinct from your living zone rug to reinforce separation
Pro Tip — Bedroom Zone
Use a circular rug in front of a round bedside table to break the grid and add organic softness to your bedroom zone. Circles read as particularly intimate and cozy, which is exactly what a sleep zone needs to feel like.
work from home
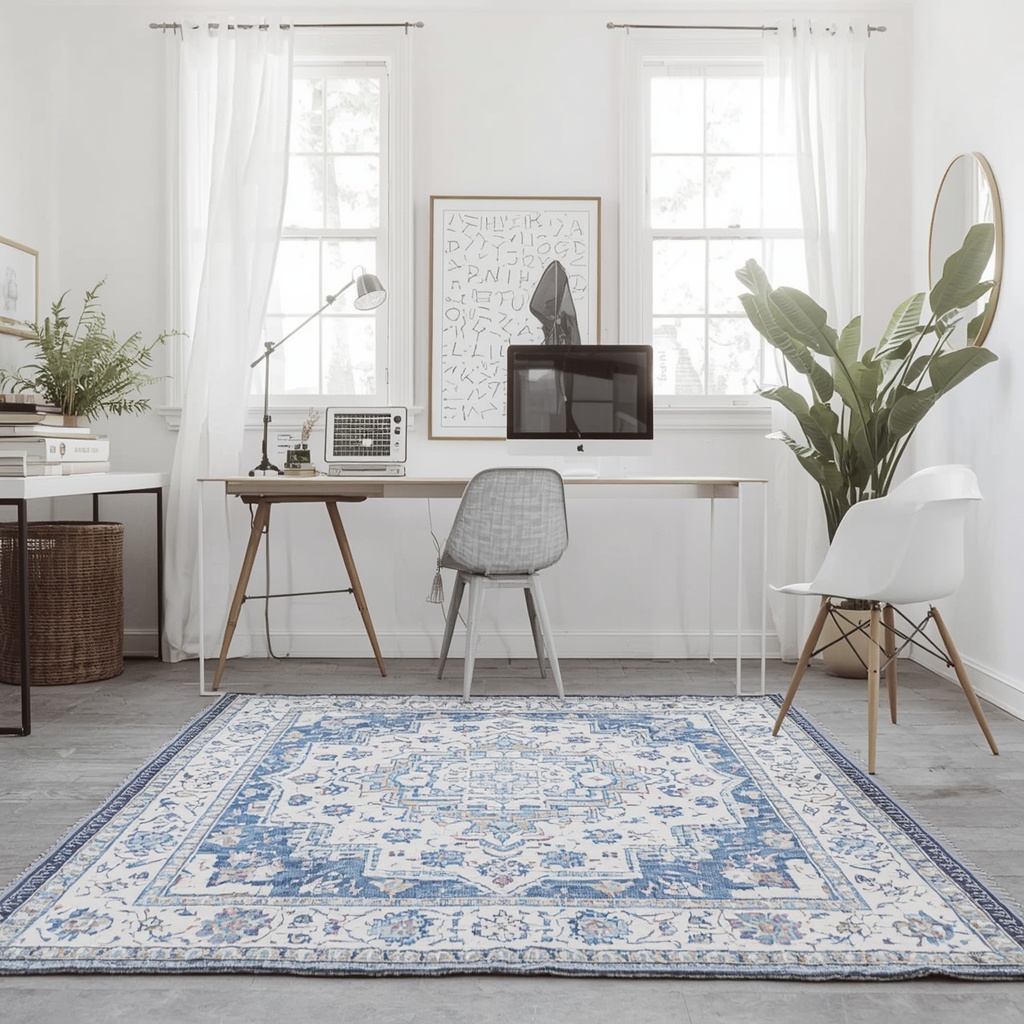
Creating a Productive Home Office Zone in Your Studio
This might be the zone that matters most to your daily wellbeing. Working from the same space you sleep and relax is genuinely hard on your mental state — unless you create real visual and tactile separation. A rug under your desk does more than protect your floors; it tells your brain that this is a mode-switch moment.

For the home office zone, I recommend a low-pile or flatweave rug in a cooler, more structured color — slate blue, forest green, charcoal, or natural jute. These cooler tones promote focus and signal “work mode” in a way that warm, cozy bedroom colors don’t. Size it so your desk chair can roll freely without catching on the rug edge — a 6×9 or 5×7 rug typically works well for most desk setups.
common questions
Studio Rug Zoning FAQ — Answers From the Design Desk
| Question | Designer’s Answer |
|---|---|
| Can I use the same rug style in every zone? | You can, but vary the scale. Same texture, different sizes, creates cohesion without monotony. |
| What if my studio is under 350 sq ft? | Use 2 rugs max. Prioritize the living zone and sleep zone. Keep a clear bare path through the middle. |
| Should all rugs be the same shape? | No — mixing a rectangular living rug with a round bedroom rug adds visual interest and reinforces zone differences. |
| Do I need rug pads? | Always. They prevent slipping, protect your floors, and add cushioning that makes cheaper rugs feel more luxurious. |
| Can rugs overlap? | Layering is trending, but keep it to one zone only (usually the living area) — layering in multiple zones reads as chaotic. |
| What’s the best rug brand for studio apartments? | Ruggable (washable, great for small spaces), Loloi, West Elm, and IKEA’s STOCKHOLM collection are all strong picks at different price points. |
finishing up
The Final Layer: Lighting, Plants, and Rugs Working Together
Rugs do the foundational zoning work, but the zones truly come alive when you align your lighting to match. Place a floor lamp within each rug zone — not shared between zones. When you turn on just the lamp over your living zone in the evening, the rug beneath the sofa glows warm and the “living room” materializes, even though nothing physically changed. This lighting-plus-rug combination is the closest thing to architectural magic I know of in small space design.
Add a plant or a sculptural object at the edge of each zone as a soft boundary marker. A fiddle leaf fig at the corner where your living rug ends is more visually appealing than a room divider and takes up zero additional floor space. The goal is layered cues: the rug defines the boundary, the light activates the zone, and the plant marks the edge. Together, they create rooms that feel designed — not improvised.
- Use a floor lamp or pendant per zone to activate each area independently at night
- Position plants at zone edges — they function as natural, breathing room dividers
- Use warm-toned bulbs (2700K) in rest zones, cool-toned (4000K) in work zones
- Mirror placement at the boundary of two zones creates depth and makes the apartment feel larger
- Curtains or sheer room dividers can reinforce rug zones visually, especially for the bedroom
Final Pro Tip — The 30-Second Rule
Stand at your front door and look across the entire apartment. If you can immediately read each zone without thinking — “there’s the living room, there’s the bedroom, there’s the desk” — your rug zoning is working. If it all looks like one big room, go back and strengthen the gaps between rugs or add a light source to a zone that’s disappearing visually.