Vertical Decorating: How to Use Your Walls for Storage and Style
Transform every inch of vertical space into a stunning design statement that works as hard as it looks.
If you’ve ever walked into a room and thought, “Something feels off — it’s just so… flat,” chances are the walls were being wildly underutilized. As an interior designer who has reimagined hundreds of American homes — from compact NYC studios to sprawling Texas ranch houses — I can tell you with confidence: vertical space is the most overlooked design opportunity in any home. Learning how to decorate walls for both storage and style is not just a trend. It’s a fundamental design principle that can completely transform how your home looks, feels, and functions.
Whether you’re living in a small apartment where every square foot counts, or a larger home that just feels disconnected and uninspired, vertical decorating gives you the tools to go upward — and upward is exactly where great design lives. In this guide, I’ll walk you through everything you need to know about wall storage ideas, vertical shelving systems, gallery wall design, functional wall decor, and how to layer it all into a cohesive, magazine-worthy interior.
Why Vertical Space Is Your Home’s Secret Weapon
Most of us design our homes from the floor up — we pick the sofa, the rug, the coffee table — and then we stop. The walls? We slap up a framed print and call it a day. But here’s what seasoned interior designers know that most homeowners don’t: the average American home uses less than 30% of its available wall space intentionally. That means roughly 70% of your home’s vertical real estate is sitting there, doing absolutely nothing for you.

Vertical decorating is the practice of treating your walls not as blank backgrounds, but as active participants in your room’s function and aesthetic. It encompasses everything from floor-to-ceiling bookshelves and floating wall shelves to pegboards, modular storage panels, and thoughtfully arranged gallery walls. When done well, it draws the eye upward, creates the illusion of taller ceilings, maximizes storage without sacrificing floor space, and gives every room a sense of intentional, layered design.
The walls of a room are like the pages of a story. Leave them blank, and you’ve said nothing. Fill them thoughtfully, and the entire narrative of a home comes to life.— Interior Design principle, widely attributed in American design culture
The beauty of vertical design is that it scales to any budget, any style, and any square footage. You don’t need a massive renovation budget or a total redesign. You need the right approach — and I’m here to give it to you.
Understanding the Three Zones of Your Walls
Before you start drilling holes or ordering shelving units, you need to understand how designers think about walls. We divide vertical space into three zones, and knowing how to work each one is the foundation of great vertical decorating.
| Wall Zone | Height Range | Best For | Design Role |
|---|---|---|---|
| Lower Zone | Floor to 4 ft | Base cabinets, low shelving, wainscoting, baskets | Anchor, grounding |
| Middle Zone | 4 ft to 6 ft | Gallery walls, floating shelves, hooks, art | Eye-level impact, daily interaction |
| Upper Zone | 6 ft to ceiling | Tall bookcases, display shelves, architectural interest | Volume, drama, height illusion |
A room that only uses the middle zone feels flat and predictable. A room that activates all three zones feels rich, intentional, and professionally designed. Your goal in every room should be to hit at least two of the three zones, and ideally all three where space allows.
Pro Tip
When hanging art or shelves in the middle zone, aim to position the center of your arrangement at approximately 57–60 inches from the floor — the average human eye level. This is the standard used by most American museums and galleries, and it’s the reason professionally hung art always feels “right” even when you can’t explain why.
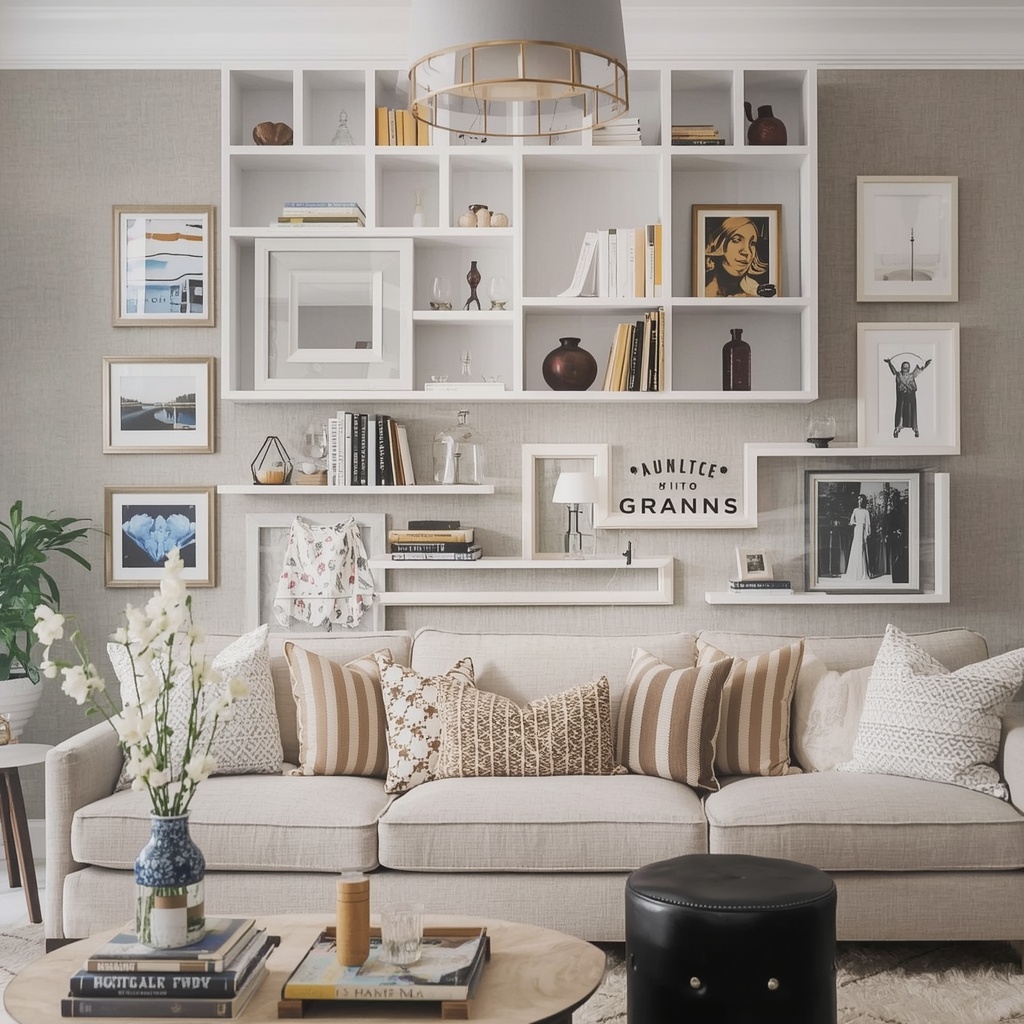
Wall Shelving Systems: The Backbone of Vertical Storage
If there is one investment that consistently delivers the biggest transformation in the homes I design, it is a well-chosen wall shelving system. We are not talking about a single floating shelf above the toilet. We are talking about intentional, layered shelving that serves a real organizational function while looking absolutely beautiful doing it.
The American home design market is flooded with options, and sorting through them can be overwhelming. So here is how I narrow it down for every client I work with: think first about your lifestyle, then your aesthetic, and finally your budget. A busy family with three kids needs different shelving than a single professional who works from home. Understanding your actual storage needs before you select a system will save you from costly mistakes and endless Pinterest rabbit holes.
Types of Wall Shelving Worth Knowing
- Floating shelves — Clean, minimal, and incredibly versatile. Works in every room from the kitchen to the bedroom. Look for solid wood or thick MDF options for durability over cheaper laminate versions.
- Built-in shelving — The gold standard for storage and style. Adds real estate value to your home and looks custom and intentional. Best installed by a professional carpenter.
- Modular wall systems — Brands like IKEA’s KALLAX and BILLY series, String Furniture, and Vitsœ offer flexible configurations you can adapt over time. Perfect for renters and those who like to change things up.
- Industrial pipe shelving — A DIY-friendly option with a raw, loft-inspired look that pairs well with exposed brick, dark walls, and eclectic decor styles.
- Ladder shelves — Leaning ladder shelves require zero wall damage, making them a renter’s best friend. Limited in weight capacity but great for books, plants, and decorative objects.
- Corner shelving — An often-ignored opportunity. Corner floating shelves or built-in corner units make use of dead space that is almost always wasted in American homes.
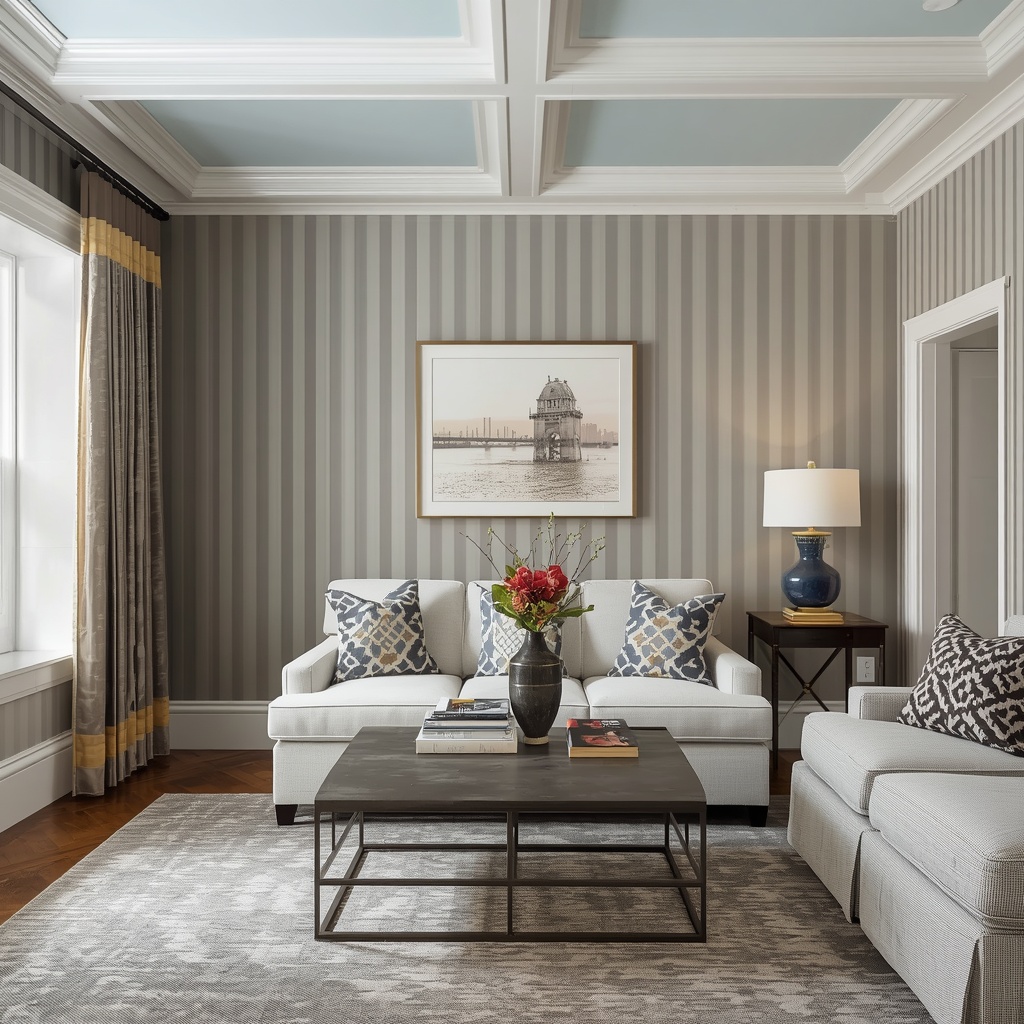
Gallery Walls: Where Storage Meets Fine Art
A gallery wall is no longer just a collection of random framed photos from your college years. In the gallery wall has evolved into one of the most expressive and practical vertical decorating tools available to homeowners. Done right, a gallery wall can serve as the visual centerpiece of an entire room — a conversation piece, a personal archive, and a design statement all rolled into one.
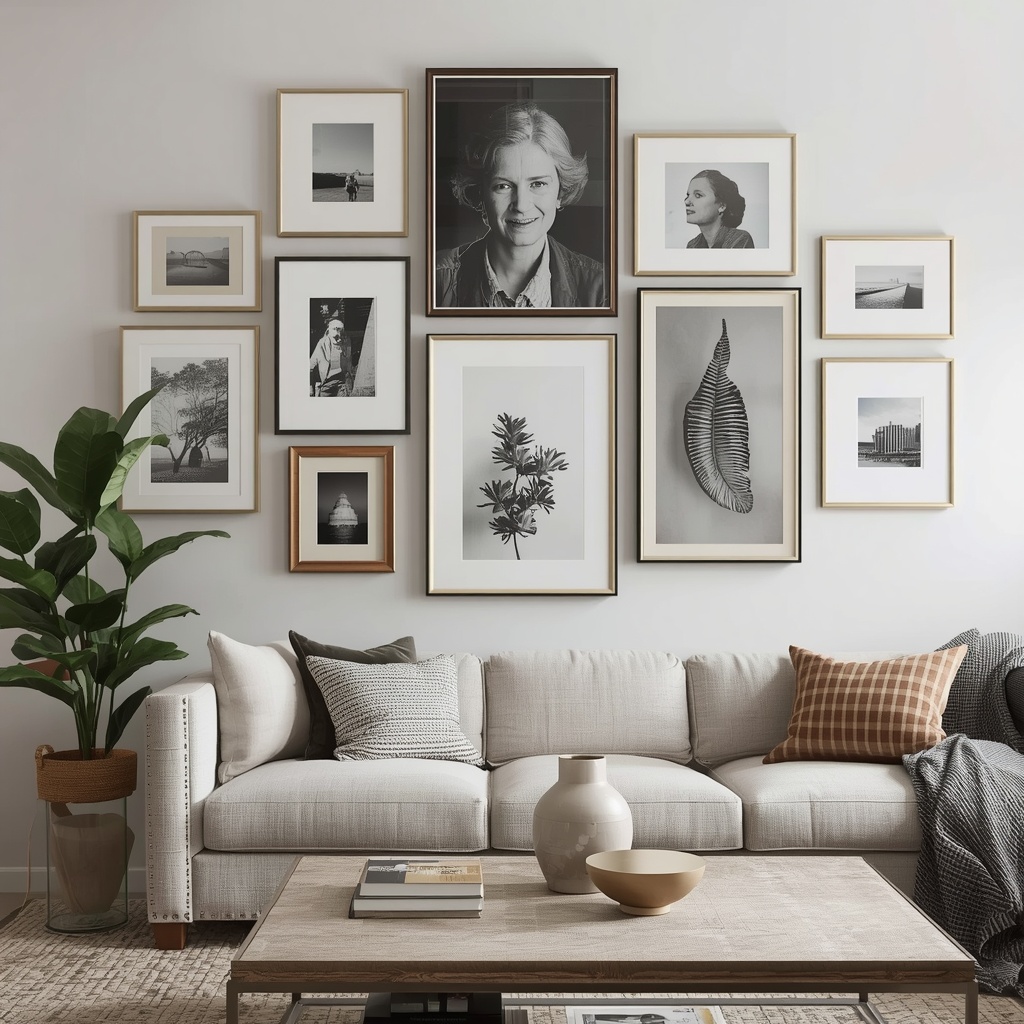
The key to a gallery wall that feels curated rather than chaotic comes down to three design principles: cohesion, contrast, and intentional asymmetry. Cohesion means choosing a unifying element — it could be a consistent frame color, a shared color palette in the art itself, or a theme like travel photography or botanical prints. Contrast means varying your frame sizes and art styles so there is visual interest and movement. And intentional asymmetry means arranging your pieces so the layout has balance without feeling rigid or predictable. Lay everything on the floor before you put a single nail in the wall.
Designer’s Note
For a gallery wall that serves double duty as vertical storage, mix framed art with functional wall-mounted elements: a small floating shelf that holds a candle or plant, a wall-mounted clock, a mirror (which also amplifies light and creates the illusion of space), or even a decorative pegboard section. The best gallery walls have depth and dimension — not just flat frames.
Gallery Wall Arrangement Styles at a Glance
| Style | Look & Feel | Best Room | Difficulty |
|---|---|---|---|
| Grid Layout | Symmetrical, clean, modern | Office, hallway | Easy |
| Salon Style | Layered, maximalist, eclectic | Living room, dining room | Moderate |
| Organic/Free-Form | Casual, collected, personal | Bedroom, family room | Moderate |
| Linear Horizontal | Streamlined, editorial | Above sofa, over bed | Easy |
| Staircase Follow | Dynamic, architectural | Stairwell walls | Moderate |
Functional Wall Decor: When Every Piece Has a Purpose
One of the biggest shifts in American home decor over the last decade has been the move toward functional beauty — the idea that the things we put in our homes should not just look good, but do something useful. Nowhere is this more achievable than on your walls. Functional wall decor is the practice of choosing decorative elements that also solve a real organizational or spatial problem.
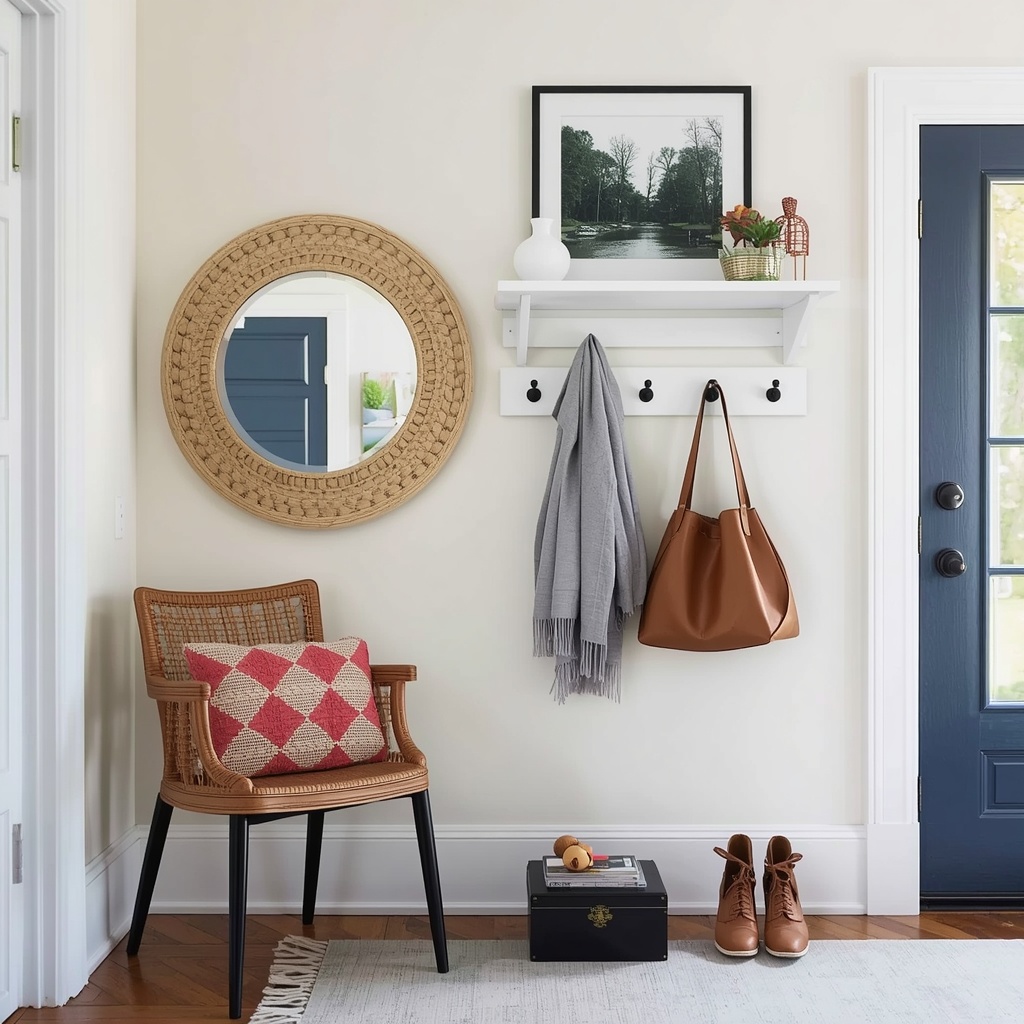
Think about the entryway of your home. It is the first thing you see when you walk in and the last thing you interact with before you walk out. Most American entryways are wildly under-designed — a coat rack from Target and a pile of shoes on the floor. Transforming that wall with a combination of a large mirror (functional: checks your appearance before leaving), a wall-mounted coat and bag hook system (functional: keeps outerwear off the floor), a small floating shelf (functional: keys, mail, a plant), and a piece of art or decorative element above it creates a space that is both beautiful and brilliantly practical.
Pro Tip
In kitchens and home offices, magnetic knife strips, pegboards, and wall-mounted bins are three of the most underused vertical storage solutions in American homes. A well-styled pegboard in a kitchen can hold pots, pans, utensils, spice jars, and even small plants — all while becoming one of the most visually interesting features in the room. Use a coat of chalk paint or a bold color on the pegboard itself to make it feel intentional rather than utilitarian.
Room-by-Room Functional Wall Decor Ideas
- Living Room: Floor-to-ceiling bookshelves flanking a fireplace create built-in symmetry and enormous storage. Style them with a mix of books, objects, and plants using the designer’s “rule of three.”
- Kitchen: Open wall shelving replaces upper cabinets for a modern, airy look. Combine with a magnetic knife strip and a rail system with S-hooks for maximum wall storage.
- Bedroom: Floating bedside shelves instead of bulky nightstands reclaim floor space and create a cleaner, more spacious feel. Add a wall-mounted reading light to each side.
- Home Office: A full wall of modular shelving keeps your workspace organized and gives you a professional, high-design backdrop for video calls.
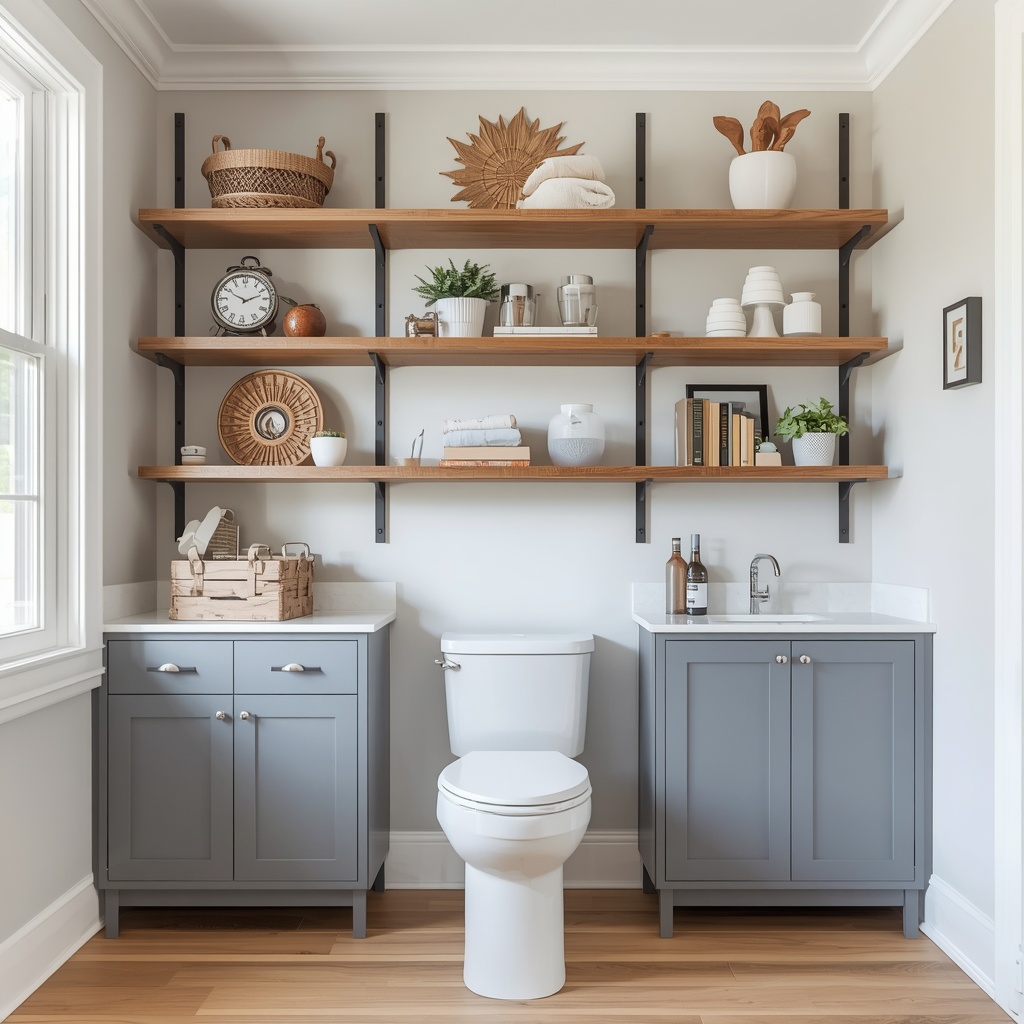
- Bathroom: Recessed shelving between wall studs (called “niche shelving”) creates storage that takes up zero visual or floor space. Perfect for toiletries in small bathrooms.
- Entryway: A combination of hooks, a floating bench with hidden storage below, and a large mirror creates a fully functional drop zone that doubles as a design statement.
- Kids’ Rooms: Low wall-mounted shelves that grow with your child — start with picture book displays at age two, transition to standard shelving at age six, and convert to desk-height storage by the teen years.
Using Vertical Lines and Architectural Details to Add Height
One of the most powerful tools in a designer’s visual toolkit is the strategic use of vertical lines to make any room feel taller than it actually is. This is especially valuable in older American homes where ceiling heights can feel low, or in basement conversions and small apartments where you cannot change the architecture but you absolutely can change the perception of it.
Vertical stripes — whether painted directly on the wall, applied as wallpaper, or created through the use of vertically oriented paneling like shiplap or board-and-batten — draw the eye upward and make walls appear to stretch toward the ceiling. Tall, narrow bookcases have the same effect. Curtains hung close to the ceiling and allowed to pool slightly at the floor are one of the oldest tricks in the interior design book for adding perceived height to a room — and it works every single time. Pair these techniques with lighting that washes the upper walls with a warm glow (called wall washing or uplighting) and you have a room that feels dramatically taller without changing a single structural element.
Pro Tip
Paint your ceiling the same color as your walls — or one shade lighter — to eliminate the visual “cap” that makes rooms feel boxed in. This technique, used extensively in high-end American interior design, creates a seamless visual envelope that makes ceilings feel significantly higher. It works especially well in rooms with 8-foot ceilings, which are standard in most American homes built since the 1980s.
Styling Your Vertical Surfaces: The Design Principles That Make It All Work
Having the right shelves, hooks, and gallery wall is only half the equation. The other half — and honestly the more artful half — is knowing how to style what goes on those surfaces. This is where I see most homeowners struggle, and it is completely understandable. Styling is an instinct that designers develop over years of training and practice. But there are concrete principles you can apply right now that will make your vertical surfaces look intentional, layered, and beautiful.
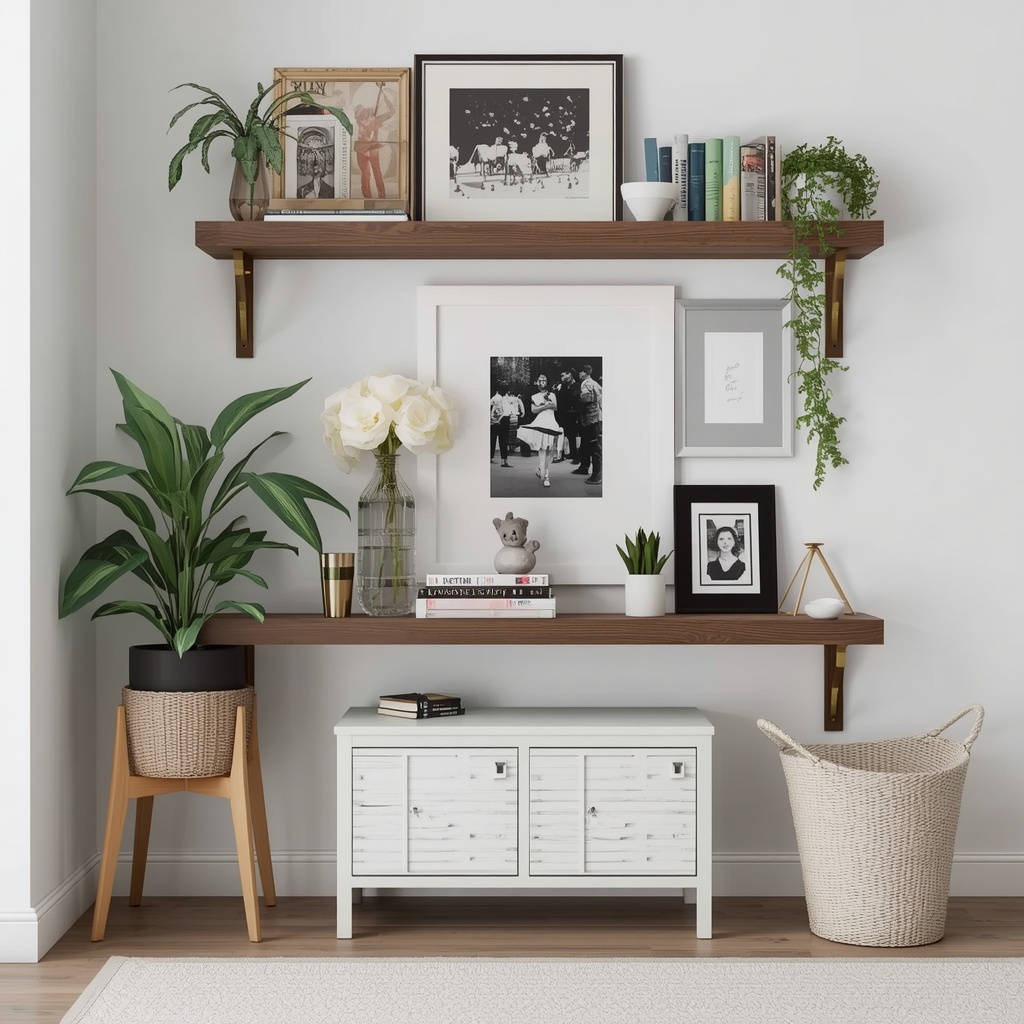
The first principle is the rule of odd numbers. Groups of three and five objects almost always look more dynamic and pleasing than groups of two or four, which can feel stiff and matched. The second is vary your heights — mix tall, medium, and low objects on any given shelf or arrangement. The third is create visual triangles — if you draw lines connecting the three tallest points of any shelf arrangement, they should roughly form a triangle, which creates movement and flow. The fourth, and perhaps most important, is to edit ruthlessly. The biggest styling mistake American homeowners make is overcrowding. Negative space is not empty space — it is breathing room, and it makes every curated object look more intentional and valuable.
The Vertical Decorating Styling Checklist
- Vary object heights on every shelf (tall, medium, short in groups)
- Mix textures: wood, ceramic, metal, glass, and organic materials (plants, stone)
- Use a consistent color palette across your wall arrangements
- Include at least one living element — a trailing plant or potted greenery per vignette
- Allow 30–40% of shelf space to remain open (negative space is a design tool)
- Layer objects — place small items in front of larger ones to create depth
- Include a mix of personal items (photos, travel mementos) and designed objects
- Ensure your wall arrangements have a clear focal point that anchors the eye
Vertical Decorating for Small Spaces: Apartment-Friendly Solutions
If you are renting an apartment or working with a genuinely small footprint, vertical decorating is not just a nice design choice — it is a necessity. Floor space in small American apartments is precious real estate that should be reserved for furniture you actually live in: your sofa, your bed, your dining table. Everything else — your books, your art, your organizational systems, your plants — should be going on the walls.
The good news for renters is that the no-damage wall storage market has exploded in recent years. Products like Command strips, adhesive rail systems, tension-rod shelving units, and freestanding ladder shelves give apartment dwellers more vertical storage options than ever before. The over-the-door organizer has also evolved far beyond the plastic shoe pocket — today’s versions include elegant linen and wire designs that work beautifully in kitchens, bathrooms, and closet areas. And do not underestimate the power of a single, well-placed oversized mirror on a primary wall — it visually doubles your space and brings in light in a way that no other design element can replicate at a similar price point.
| Challenge | Vertical Solution | Renter-Friendly? |
|---|---|---|
| No storage space | Floor-to-ceiling freestanding shelving unit | Yes |
| Too much kitchen clutter | Magnetic knife strip + wall-mounted rail with hooks | Partial |
| Room feels small and low | Tall curtains hung near ceiling, vertical stripe wallpaper | Yes |
| No entryway space | Over-the-door hook system + adhesive floating shelf | Yes |
| Bare, uninspiring walls | Removable wallpaper, gallery wall with Command strips | Yes |
Where to Start: Your Vertical Decorating Action Plan
If you have read this far, you are already thinking differently about your walls — and that is the most important shift of all. Vertical decorating is not a single project with a start and an end date. It is an evolving practice of looking at your walls and asking: what could this surface be doing that it is not doing right now? Sometimes the answer is a set of floating shelves. Sometimes it is a gallery wall that tells the story of your family. Sometimes it is simply a bold coat of paint and a single dramatic piece of art hung in exactly the right place.
Start with one wall in one room. Identify which of the three zones you want to activate — lower, middle, or upper — and pick one wall storage solution from this guide to implement. Measure twice, plan carefully, and then commit. Once you see the transformation that even a single intentional vertical element can make in a room, you will never look at a blank wall the same way again. Your home has more space than you think — it has just been hiding in plain sight, waiting for you to look up.
Design is not about filling every inch — it is about making every inch count. When you learn to work vertically, you stop fighting your home’s limitations and start discovering its full potential.— Interior design philosophy on spatial maximization.